| 일 | 월 | 화 | 수 | 목 | 금 | 토 |
|---|---|---|---|---|---|---|
| 1 | 2 | 3 | 4 | 5 | 6 | 7 |
| 8 | 9 | 10 | 11 | 12 | 13 | 14 |
| 15 | 16 | 17 | 18 | 19 | 20 | 21 |
| 22 | 23 | 24 | 25 | 26 | 27 | 28 |
- HTML
- C++
- jupyter
- vim
- 포인터
- c# 윈폼
- 도커
- C언어 포인터
- 구조체
- 깃
- C# delegate
- docker
- dart 언어
- c#
- git
- Houdini
- c# 추상 클래스
- jupyter lab
- 플러터
- gitlab
- Flutter
- 다트 언어
- Unity
- c# winform
- Python
- Data Structure
- Algorithm
- c언어
- 유니티
- github
- Today
- Total
nomad-programmer
[MacOS] iTerm2 & zsh (oh-my-zsh) 본문
// home brew 설치
/usr/bin/ruby -e "$(curl -fsSL https://raw.githubusercontent.com/Homebrew/install/master/install)"
iTerm2 설치
iTerm2 - macOS Terminal Replacement
iTerm2 by George Nachman. Website by Matthew Freeman, George Nachman, and James A. Rosen. Website updated and optimized by HexBrain
www.iterm2.com
위의 링크로 가서 다운로드 후 설치한다.
iTerm2 테마 설정
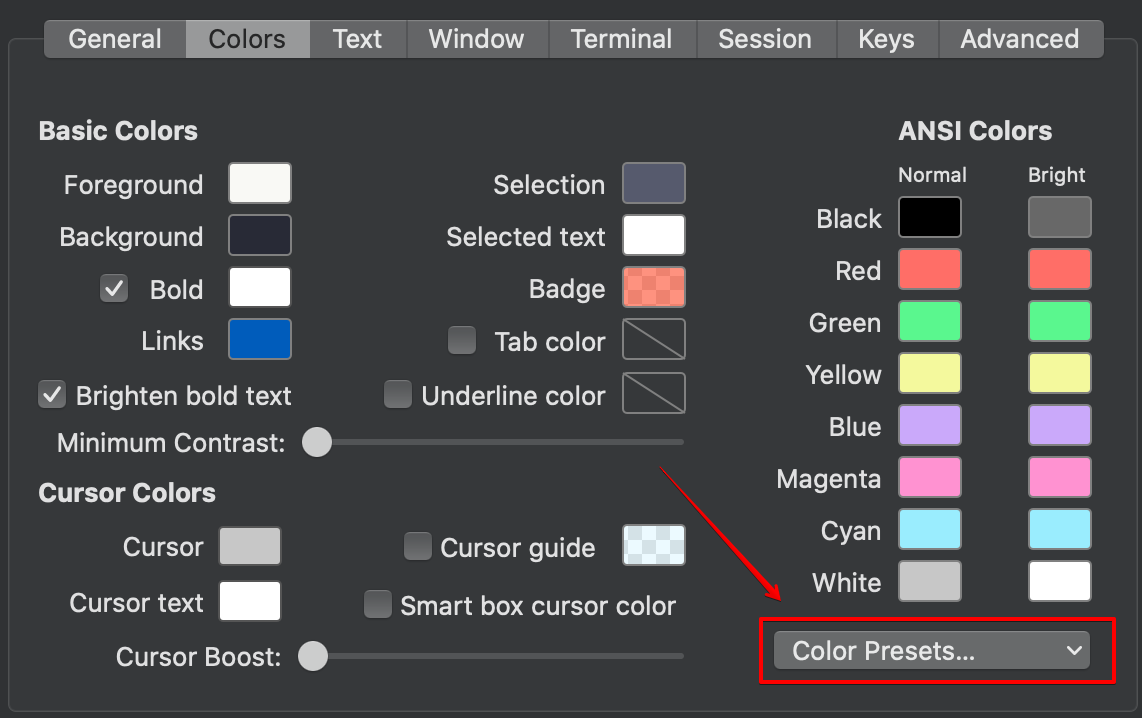
환경 설정 - Profiles - Colors

표시된 저곳을 클릭하여 "Visit Online Gallary" 메뉴를 클릭한다. 그러면 테마를 다운로드 받을 수 있다.
다운로드 받은 테마 폴더중 "schema" 폴더의 모든 테마 스키마를 임포트한다. 나는 테마 중 드라큐라 테마를 선택하였다.
// ~/.zshrc에 테마 변경
ZSH_THEME="dracula"
Apperance 탭에서 Show line under title bar... 체크 해제
zsh 플러그인 설치
// zsh-completions 설치
brew install zsh-completions

// oh-my-zsh 설치
sh -c "$(curl -fsSL https://raw.githubusercontent.com/robbyrussell/oh-my-zsh/master/tools/install.sh)"

// zsh 하이라이팅 플러그인 설치
git clone https://github.com/zsh-users/zsh-syntax-highlighting.git ${ZSH_CUSTOM:-~/.oh-my-zsh/custom}/plugins/zsh-syntax-highlighting

// zsh 자동완성 플러그인 설치
git clone https://github.com/zsh-users/zsh-autosuggestions $ZSH_CUSTOM/plugins/zsh-autosuggestions
설치 완료 후 ~/.zshrc 파일을 열어 plugins 항목 부분을 찾는다. 그곳에 다음과 같이 추가한다.
plugins=(
  git
  zsh-syntax-highlighting
  zsh-autosuggestions
)
이곳을 참고하여 ohmyzsh 플러그인을 설치하면 된다.
https://gist.github.com/n1snt/454b879b8f0b7995740ae04c5fb5b7df
Oh my ZSH with zsh-autosuggestions zsh-syntax-highlighting zsh-fast-syntax-highlighting and zsh-autocomplete.md
Oh my ZSH with zsh-autosuggestions zsh-syntax-highlighting zsh-fast-syntax-highlighting and zsh-autocomplete.md - Oh my ZSH with zsh-autosuggestions zsh-syntax-highlighting zsh-fast-syntax-highligh...
gist.github.com
'OS > MAC' 카테고리의 다른 글
| [MAC] MacOS 개발 환경 구축 (0) | 2020.11.25 |
|---|
