| 일 | 월 | 화 | 수 | 목 | 금 | 토 |
|---|---|---|---|---|---|---|
| 1 | 2 | 3 | 4 | 5 | 6 | 7 |
| 8 | 9 | 10 | 11 | 12 | 13 | 14 |
| 15 | 16 | 17 | 18 | 19 | 20 | 21 |
| 22 | 23 | 24 | 25 | 26 | 27 | 28 |
- Algorithm
- 포인터
- 구조체
- HTML
- Data Structure
- jupyter lab
- gitlab
- C언어 포인터
- C# delegate
- github
- c#
- Houdini
- 다트 언어
- dart 언어
- C++
- 도커
- c# 추상 클래스
- Unity
- c# winform
- c# 윈폼
- 플러터
- c언어
- docker
- vim
- 유니티
- jupyter
- git
- 깃
- Flutter
- Python
- Today
- Total
nomad-programmer
[Programming/Flutter] Provider 패턴으로 만든 StopWatch APP 본문

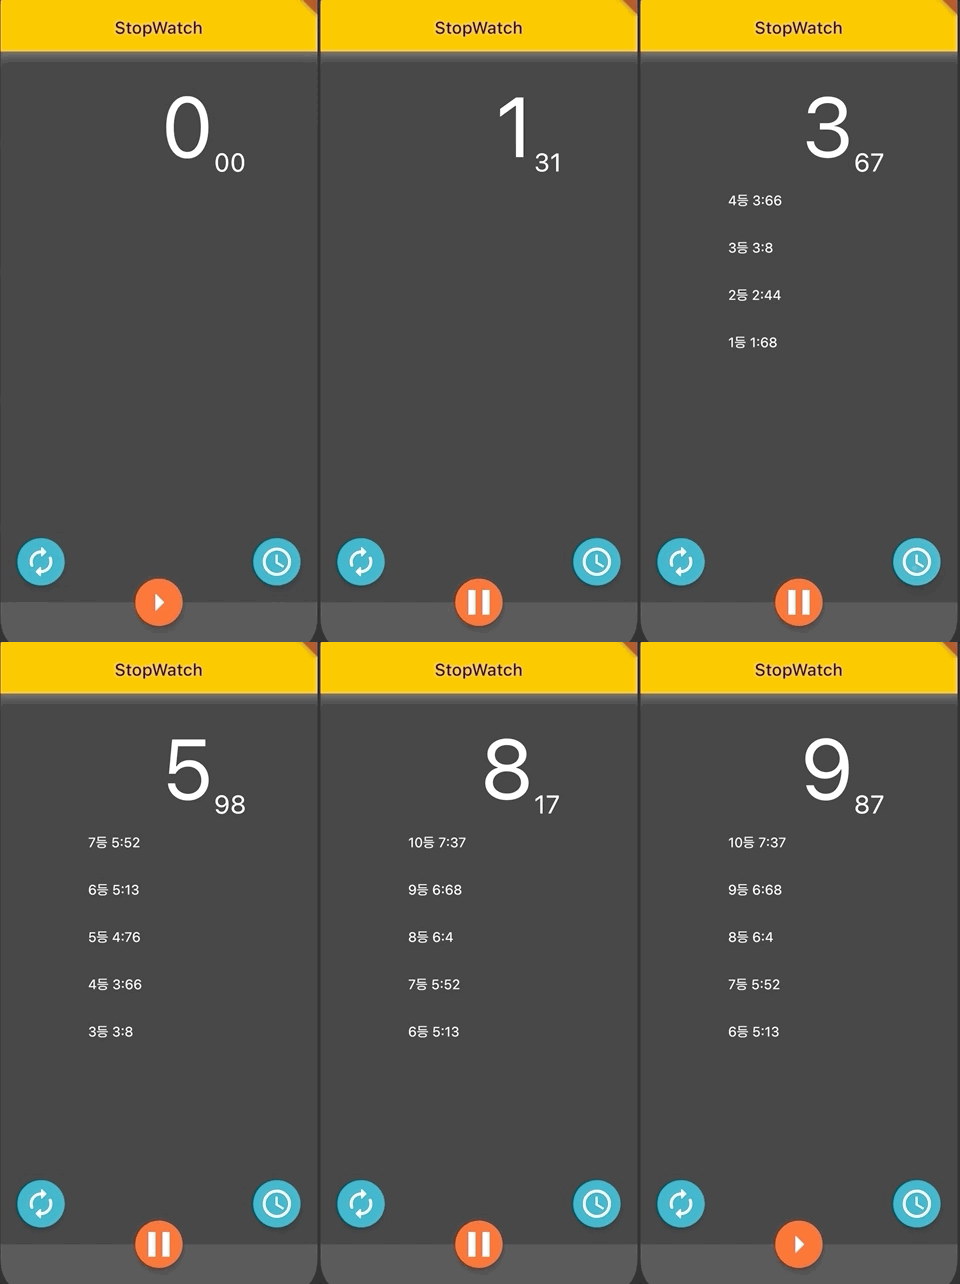
해당 스탑워치는 0.01초까지 측정 가능하며 Timer 클래스를 활용하여 0.01초마다 화면을 갱신한다.
main.dart 파일 코드
// main.dart

import 'package:flutter/material.dart';
import 'package:provider/provider.dart';
import 'aboutTime.dart';

void main() => runApp(MyApp());

class MyApp extends StatelessWidget {
  @override
  Widget build(BuildContext context) {
    return ChangeNotifierProvider<AboutTime>(
      create: (BuildContext context) => AboutTime(),
      child: MaterialApp(
        title: 'Flutter Demo',
        theme: ThemeData(
          // primarySwatch: Colors.blue,
          brightness: Brightness.dark,
          primaryColor: Colors.lightBlue[800],
          accentColor: Colors.cyan[600],
          visualDensity: VisualDensity.adaptivePlatformDensity,
        ),
        home: StopSwatch(),
      ),
    );
  }
}

class StopSwatch extends StatelessWidget {
  @override
  Widget build(BuildContext context) {
    AboutTime timer = Provider.of<AboutTime>(context);
    return Scaffold(
      appBar: AppBar(
        title: Text(
          'StopWatch',
          style: TextStyle(color: Colors.black),
        ),
        backgroundColor: Colors.amber,
        shadowColor: Colors.white,
        elevation: 10,
      ),
      body: _buildBody(context),
      bottomNavigationBar: Container(
        height: 60,
        child: BottomAppBar(),
      ),
      floatingActionButton: FloatingActionButton(
        onPressed: () {
          if (!timer.isRunning) {
            timer.startTimer();
          } else {
            timer.pauseTimer();
          }
        },
        backgroundColor: Colors.deepOrange,
        child: Icon(
          timer.isRunning ? Icons.pause_sharp : Icons.arrow_right,
          size: 50,
        ),
      ),
      floatingActionButtonLocation: FloatingActionButtonLocation.centerDocked,
    );
  }

  Widget _buildBody(BuildContext context) {
    AboutTime timer = Provider.of<AboutTime>(context);
    return Padding(
      padding: const EdgeInsets.only(top: 30),
      child: Stack(
        children: <Widget>[
          Column(
            children: [
              Row(
                mainAxisAlignment: MainAxisAlignment.center,
                crossAxisAlignment: CrossAxisAlignment.end,
                children: <Widget>[
                  SizedBox(
                    width: 180,
                    child: Text(
                      '${timer.seconds ~/ 100}',
                      style: TextStyle(fontSize: 100),
                      textAlign: TextAlign.right,
                    ),
                  ),
                  SizedBox(
                    width: 50,
                    child: Text(
                      '${timer.seconds % 100}'.padLeft(2, '0'),
                      style: TextStyle(fontSize: 30),
                    ),
                  ),
                ],
              ),
              Container(
                child: ListView(
                    children: timer.laptimes
                        .map((e) => ListTile(title: Text(e)))
                        .toList()),
                height: 300,
                width: 200,
              ),
            ],
          ),
          Positioned(
            left: 20,
            bottom: 20,
            child: FloatingActionButton(
              onPressed: () => timer.resetTimer(),
              child: Icon(Icons.autorenew_rounded, size: 40),
            ),
          ),
          Positioned(
            right: 20,
            bottom: 20,
            child: FloatingActionButton(
              onPressed: () => timer.addLapTime(),
              child: Icon(Icons.access_time, size: 40),
            ),
          ),
        ],
      ),
    );
  }
}
bottomNavigationBar 프로퍼티에는 어떤 위젯도 배치할 수 있다. BottomAppBar 위젯은 말 그대로 하단에 배치하는 AppBar이다. Scaffold 위젯의 bottomNavigationBar 프로퍼티에 배치하는 것이 일반적이며, FloatingActionButton 위젯과도 자연스레 어울린다. BottomAppBar 위젯 자체로는 아무것도 없는 빈 영역이다. 일반적으로 하단 메뉴와 FloatingActionButton 위젯을 함께 사용하는 경우에 사용된다.
Stack 위젯 내부에는 여러 위젯을 겹칠 수 있다. Positioned 위젯을 Stack 위젯의 children 프로퍼티에 사용할 수 있으며 자유롭게 위치도 정할 수 있다.
ListView 위젯은 Column 위젯의 children 프로퍼티에 포함될 때 Expanded 혹은 Container 등의 위젯으로 감싸야 화면에 정상적으로 표시된다.
aboutTime.dart 파일 코드
// aboutTime.dart

import 'package:flutter/material.dart';
import 'dart:async';

class AboutTime with ChangeNotifier {
  bool _isRunning = false;
  int _secs = 0;
  Timer _timer;
  List<String> _laptime = <String>[];

  bool get isRunning => _isRunning;

  int get seconds => _secs;

  List<String> get laptimes => _laptime;

  @override
  void dispose() {
    _timer?.cancel();
    super.dispose();
  }

  void startTimer() {
    _isRunning = true;
    _timer = Timer.periodic(Duration(milliseconds: 10), (Timer timer) {
      _secs++;
      notifyListeners();
    });
  }

  void pauseTimer() {
    if (_isRunning) {
      _timer?.cancel();
      _isRunning = false;
    }
    notifyListeners();
  }

  void resetTimer() {
    _timer?.cancel();
    _secs = 0;
    _isRunning = false;
    _laptime.clear();
    notifyListeners();
  }

  void addLapTime() {
    _laptime.insert(
        0, '${_laptime.length + 1}등 ${_secs ~/ 100}:${_secs % 100}');
    notifyListeners();
  }
}
notifyListeners 메소드로 변경 사항을 알려주고 있다. 그리고 dispose를 오버라이딩해줌으로써 앱 종료 시, 실행중인 timer를 정지시켰다.
이렇게 Provider를 이용하면 StatefulWidget을 사용하지 않아도 데이터 & 앱 갱신을 할 수 있다. 또한 Provider 패턴을 이용하면 UI와 기능 클래스가 분리되어 코드 관리가 더욱 수월해진다. 그리고 효율 또한 좋아진다.
한마디로 Provider를 통해 값이 변할 때마다 매번 화면 전체를 다시 그리지 않고 일부분만 그린다.
Timer 클래스
타이머 기능의 핵심인 Timer 클래스의 사용 방법을 알아보자. Timer 클래스는 'dart:async' 패키지에 포함된 클래스로 일정 간격 동안 반복하여 동작을 수행해야 할 때 사용하는 클래스이다. 다음 코드는 0.01초에 한 번씩 작업을 수행한다.
import 'dart:async';

...

Timer.periodic(Duration(milliseconds: 10), (Timer timer) {
  // 반복 수행 할 동작 코드
})
반복 실행 주기를 Timer.periodic() 메소드의 첫 번째 인수 Duration 인스턴스에 설정하면 두 번째 인수로 받은 함수에서 실행되는 구조이다.
Duration 클래스는 주기를 정의한다. Duration 클래스의 생성자에 지정할 수 있는 프로퍼티는 다음과 같다.
- days : 날짜
- hours : 시간
- minutes : 분
- seconds : 초
- milliseconds : 1 / 1,000 (천분의 1초)
- microseconds : 1 / 1,000,000 (백만분의 1초)
예를 들어 다음과 코드는 1시간 30분마다 한 번씩 실행된다.
Duration(hours: 1, minutes: 30, (Timer timer) {
  // 실행 코드
})- Timer 클래스를 이용하면 정해진 시간 간격으로 원하는 동작을 수행시킬 수 있다.
- 숫자 형태의 문자열을 특정 자릿수로 만들고 0으로 채우려면 padLeft() 메소드를 사용한다.
- 다트에서 정수형 나누기 정수형은 double 타입이다.
'Programming > Flutter' 카테고리의 다른 글
| [Programming/Flutter] AppBar에 Gradient Color 적용 (0) | 2020.10.13 |
|---|---|
| [Programming/Flutter] Provider Pattern (0) | 2020.10.12 |
| [Programming/Flutter] TextFormField 위젯 (0) | 2020.10.11 |
| [Programming/Flutter] TextField : 입력값 출력 (0) | 2020.10.11 |
| [Programming/Flutter] 생산성을 높여주는 단축키 (0) | 2020.10.10 |


